
FORMULA WORKFLOWS: LEARNING FROM THE PROS

We understand that sometimes it takes more than just a formula code to discover what certain creatives use Mextures for and how they go about doing so. We spent some time with four of our favorite artists from four of our favorite photographic genres. We spoke to Cora Edwards (@corabell99) about her gorgeous portrait work, R. Adam Prieto (@radam2) about his amazing landscape work, Wesley Grim (@wesleygrim) about his mind-blowing composite work, and finally Matthew Custar (@matthewcustar) about his insane graphic design work. Each creative picked a particular piece of theirs and walked us through their editing process, allowing us all a glimpse into how they use Mextures to create certain effects on their images. They even shared their formula codes along with their behind the scenes insight. Have a look at the before/after images and read the brief walkthroughs that they provided because learning is neat!EDITING PORTRAIT WORK WITH CORA EDWARDS (@CORABELL99):

I wanted this portrait of the lovely Autumn to have a somewhat darker feel, so when I opened the image in the Mextures app, the first thing I did was run it through my saved formulas that I've made and saved within the Mextures app. None of them really had the look I was wanting for this particular shot (I wanted it to be darker, yet look as if light was trying to peek through), so I made one from scratch! Mextures is so easy to navigate and tweak, it wasn't long before I had 14 layers of overlays on the image (I really need to chill sometimes) and then all I had to do was fine tune the exposure, temperature, tint, and sharpness. Some of the overlays I used included Frosted, Binding, Tonic, and Brick. The real game-changer for this image though was the Aperture overlay in screen mode, which made it look as though light was coming from a source behind her left shoulder. Can I brag about Mextures here for a second? I run all of my iPhone photos through Mextures. This app never fails to give my images the exact look I'm going for - whether it's a sun-dappled meadow or a freckle-faced beauty. I love that I can create deep and mysterious, or rich and romantic. It's my go-to iPhone editing app! Check out my formula - TKBBUQJ!
EDITING LANDSCAPE WORK WITH R. ADAM PRIETO (@RADAM2):

I think a huge part of my image processing is keeping my images organic. Most of the times I shoot very flat and in post processing bring out the colors and detail. Here is my process with editing in Mextures. I first do any minor adjusting such as bringing up the shadows here and highlights there. Then I edit what speaks to me most. In this case, it’s the clouds. So I added a subtle Neutral Density overlay as well as some color to add some character. Blue Skies did the trick in this situation. Since I felt like I was lacking some warm colors in the foreground, I added the Citrus overlay to bring out some warm colors. Contrasting colors do a great job with pushing and pulling your image. Editing can always be tricky so don’t be too hard on yourself. It requires developing an eye for what to look for. Just like a musician develops an ear, practice makes perfect for anything worth pursuing. With the final image I added the Taffy and Frosted overlays to bring out my highlights and shadows. Feel free to see my formula by using formula code ESUNHRW!
EDITING COMPOSITE WORK WITH WESLEY GRIM (@WESLEYGRIM):
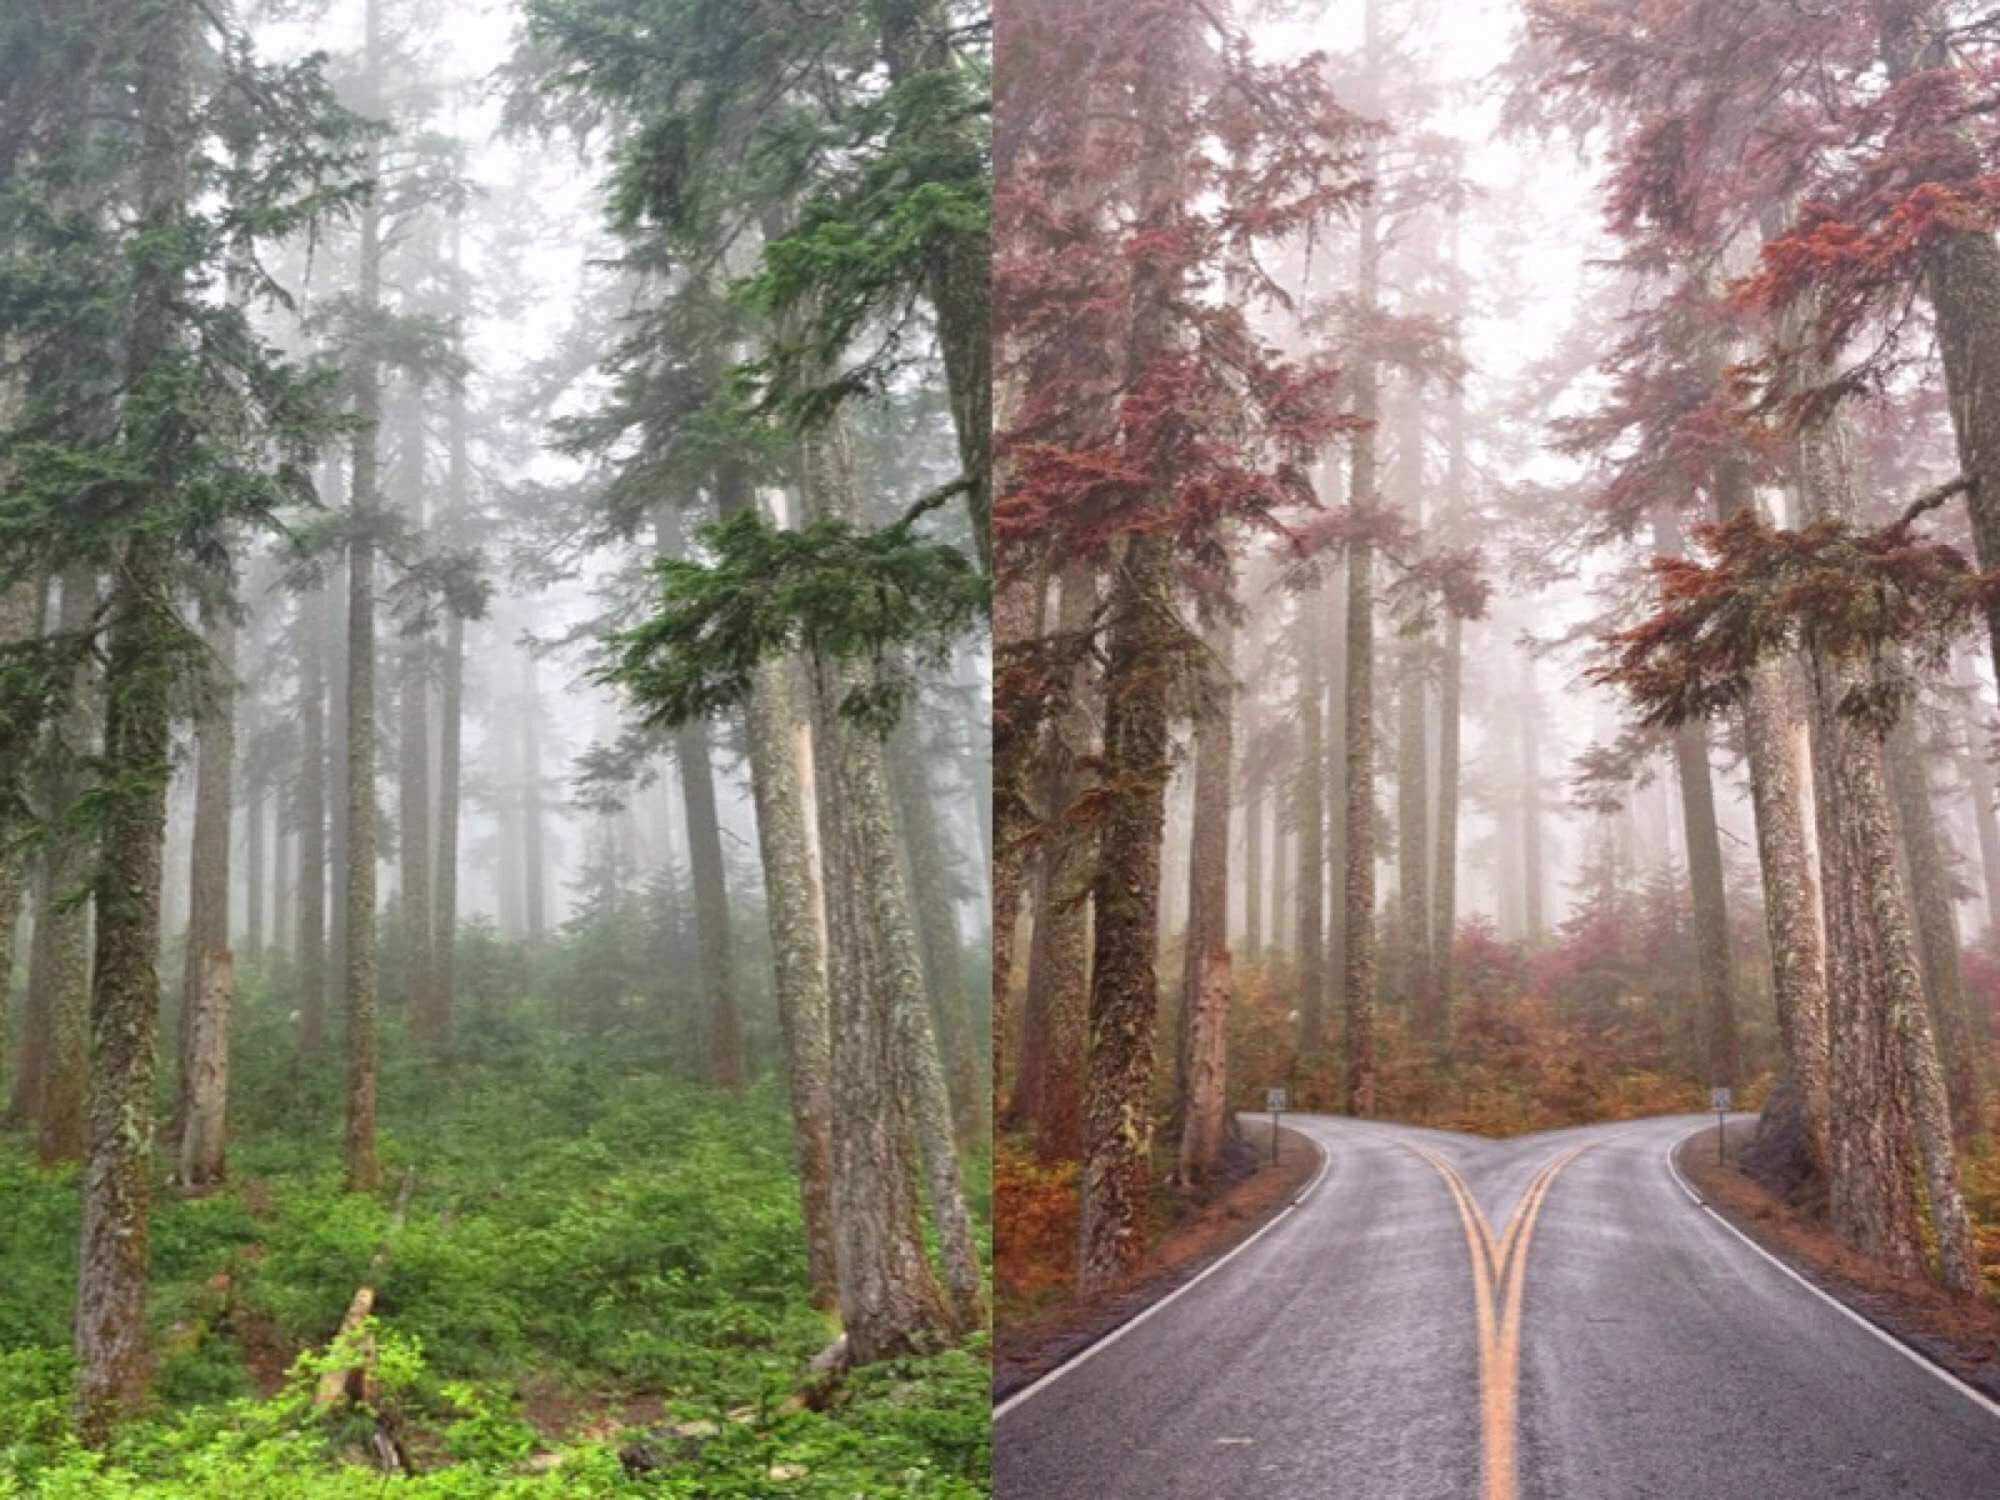
Well I'm a big fan of the Radiance gradients. With the different blend modes you really are able to create a whole new mood sometimes! For this one I used Lily, Sky Earth and Flare. I find the Overlay blend mode usually gives me the best outcome for the gradients. Then I use multiple gradients to tone the effect down so it's not too harsh. I also used a couple of the Grit and Grain and Emulsion overlays to give a new "foggy" feeling. This original is from Aaron Atanacio (aaron.atanacio) from the Mextures Collective (@mexturescollective). The moment I saw this photo I wanted to combine another of his others as well. I thought a road would look awesome going through these giant trees. Mextures was used to bring the autumn feeling to the trees and also bringing the fog out a little more as well. The greens were tweaked before Mextures because I wanted to create a formula that really punched up Fall reds and a misty feeling. Thus creating my Autumn Morning formula - SCMZRQJ!
EDITING GRAPHIC ART WITH MATTHEW CUSTAR (@MATTHEWCUSTAR):
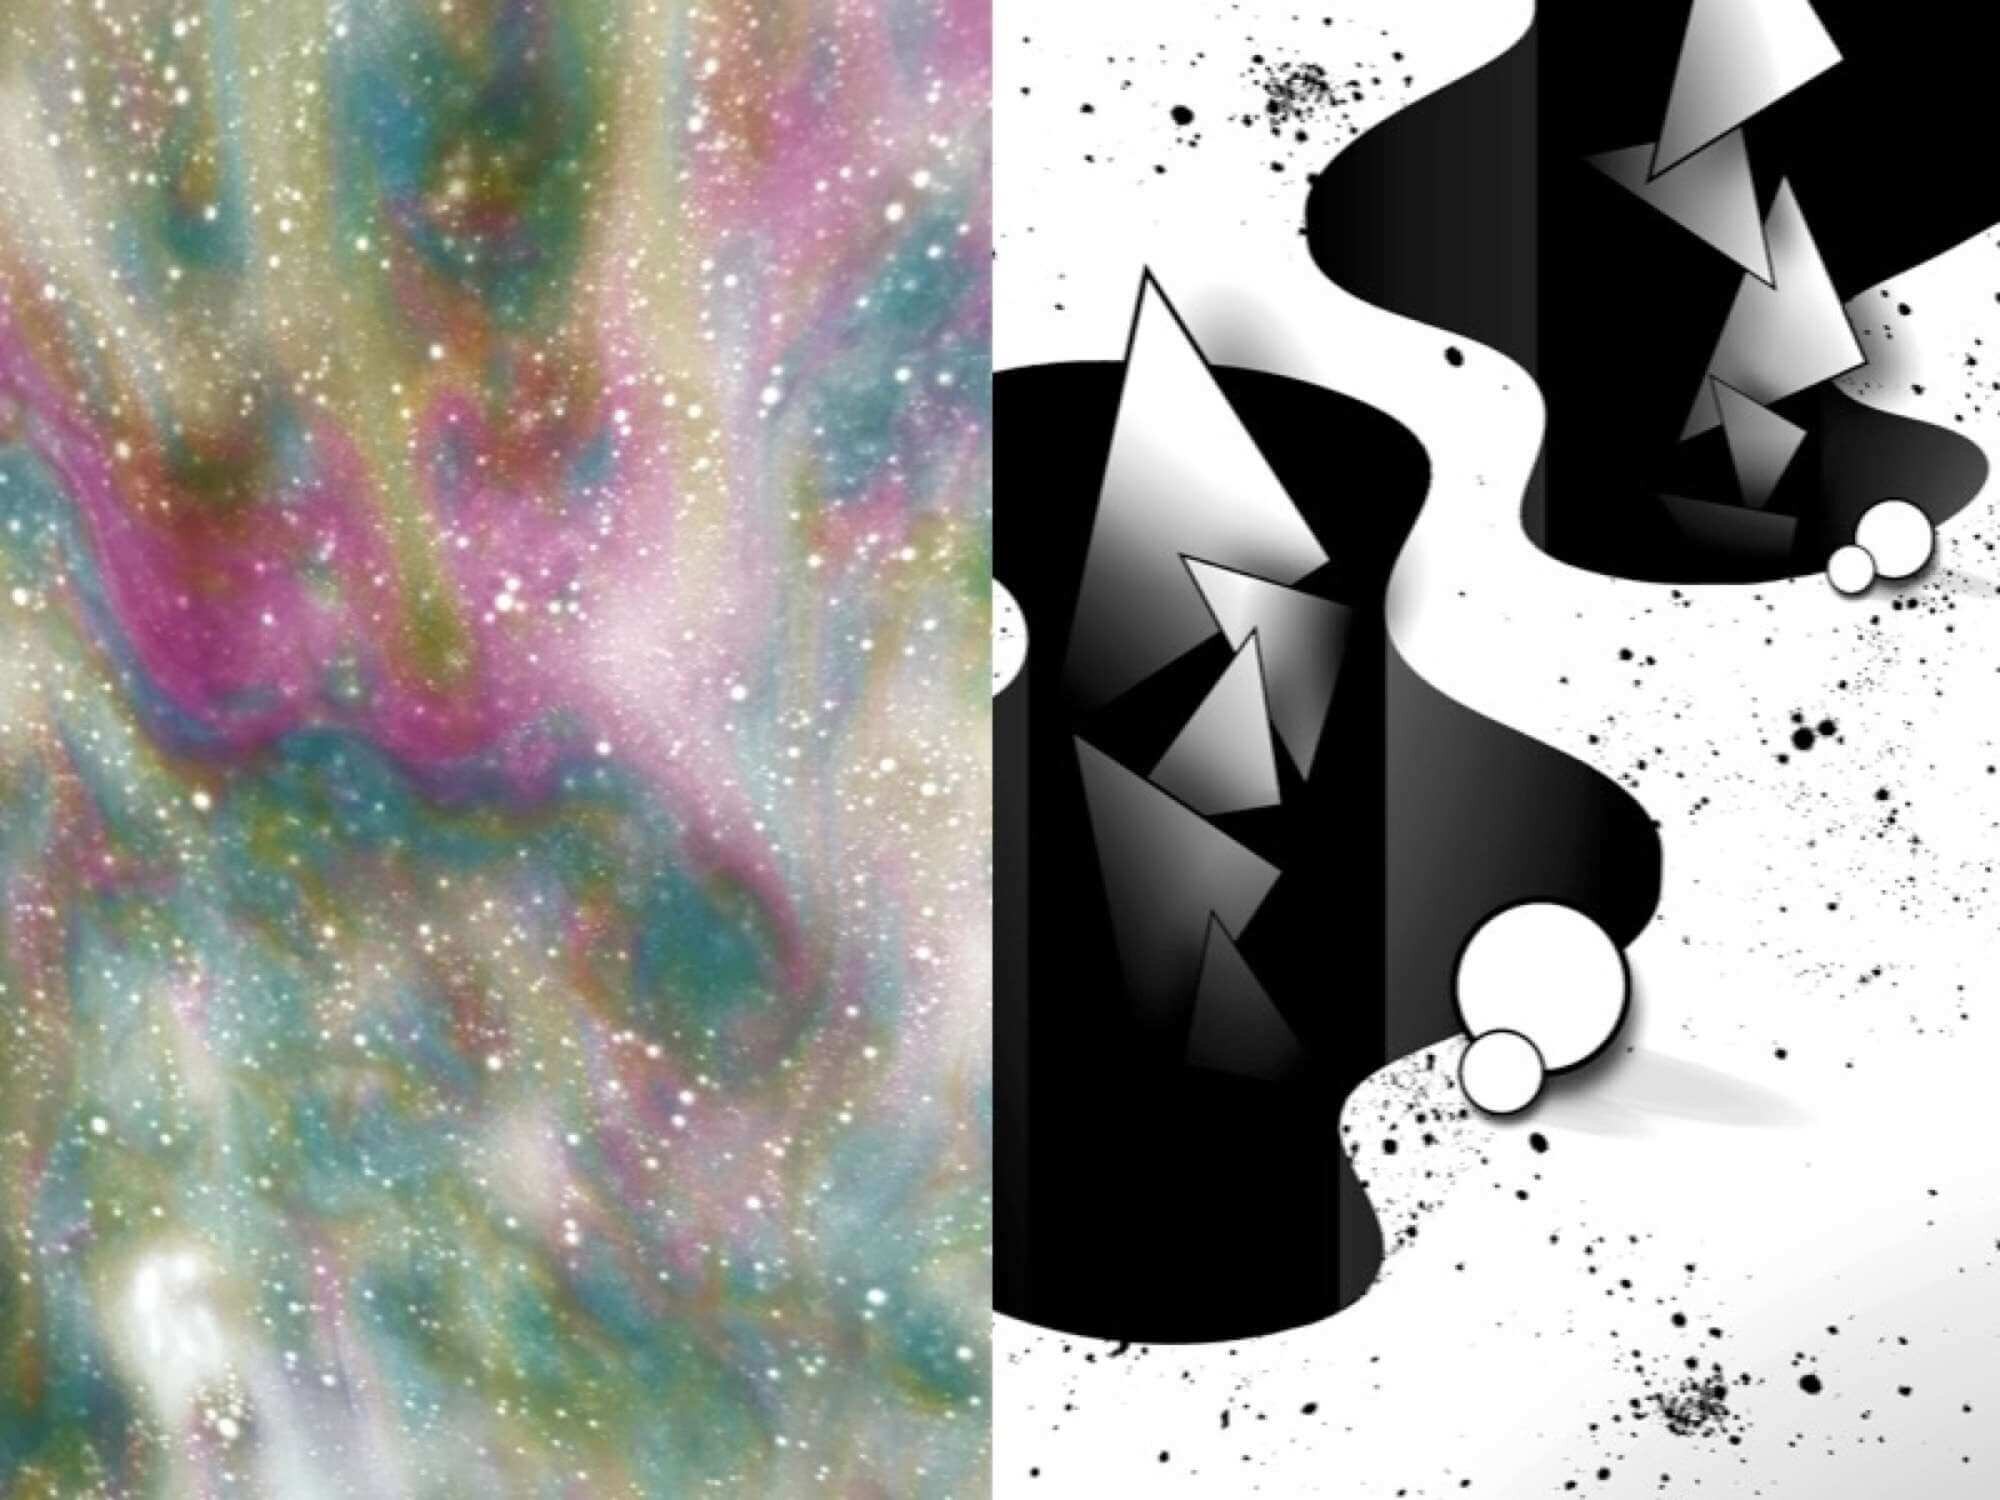
Mextures is the ultimate editing tool that I use whenever I want to create textures, filters, or adjust any contrast or coloration to my art. It is seriously that good! With this particular piece, that I titled 'TRIANGULATED', I started off using a picture that I took while I was going through a carwash. I have always been intrigued with the formless amoeba appearance that the multicolored soap creates as it cascades down the window and knew that it would result in a fantastic texture. I begin my process by taking the picture using the Mextures app and making no immediate adjustments. I then open the image and select a standard formula that I've created, to start editing with. The formula contains the Lily overlay from the Radiance package at 50%, set to the Multiply blend mode with the Holga preset. From there I start off by adjusting the Exposure (-50) and Contrast (+50) levels, in Black/White mode, almost like a game of ping-pong until a desired level of visual satisfaction is achieved. Once I have the texture, which has become the terrain in this piece, it's saved and opened in Union. This is where I begin to build, shape, and form the final piece until all parts resemble a whole. I bring the piece back into Mextures for final adjustments, using the Contrast, Exposure, and Sharpen levels. This allows me to refine the gradients and shadows. Check out my formula - USDRADZ.
Make sure to follow all four of these inredibly talented artists: @corabell99, @radam2, @wesleygrim and @matthewcustar!